Instructions for Installing
Banzai Racing FC Polyurethane Transmission Mounts
Please read carefully before
attempting to install product
- First,
disconnect the negative battery cable from the car battery.
- Refer
to Haynes Manual; Chapter 7 Part A Manual Transmission section 5
- Support
the transmission with a jack.
- Unbolt
the crossmember.
- Remove
the nuts attaching the mounts to the crossmember and the bolts attaching the
mounts to the transmission (refer to illustration 5.3 pg. 177 in Haynes
Manual).
- Remove
the mount from the crossmember.
- The
existing transmission mounts (insulators) can then be replaced with
the Banzai Racing Polyurethane Transmission Mounts (refer to illustration
5.4 pg. 178 in Haynes Manual).
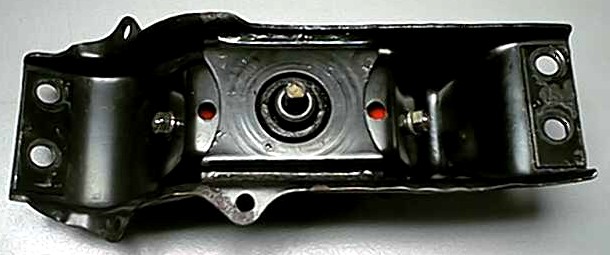
- Thread
bolt through the bracket using a flat washer from the top as shown below (Installed
Top View #1)
- Place
Transmission Mount between bracket and crossmember
- Secure
from the bottom of the crossmember using lock washer and nut provided as shown
below (Installed Bottom View #2). Tighten securely.
- Be
sure to use all Grade 8 hardware as supplied with the kit (see list of
parts below).
- Installation
of crossmember is the reverse of removal. Be sure to tighten all nuts/bolts
securely.
- Stiffness
can be adjusted by increasing or decreasing the amount of compression on the
polyurethane. This is achieved by tightening the nut to increase stiffness
(or loosening to reduce stiffness). Polyurethane will 'loosen up' during break-in
period.
|
|
|
|
Installed
Top View #1
|
Installed
Bottom View #2
|
If you have any questions or concerns
regarding installation of these mounts please contact
us
|
List of
parts in FC Transmission Mount kit:
|
| 2"
Grade-8 5/16' Bolt (x2) |
| 5/16"
Grade-8 Lock Washer (x2) |
| 5/16"
Grade-8 Flat Washer (x2) |
| 5/16"
Grade-8 Nut (x2) |
| Polyurethane
Transmission Mount/Insulator (x2) |
| Instructions |
Banzai Racing Inc. is
not liable for any damage or injury due to incorrect installation of any product